
If you’ve never tried adult coloring books before, the idea of ‘blending’ may be daunting or confusing – which is why I was excited when Claire Eadie from Colour With Claire offered to give us a tutorial on the different types of blending methods for coloring pencils and how to use them to create amazing results.
I have personally never tried most of these methods – I have always just used pressure to create the right blend between colors, as you’ll see Claire demonstrate in her first example below.
If you’re a newbie to adult coloring, this is a great tutorial to get you started. I challenge you to apply one of these techniques to your next coloring page! Instead of just coloring with a single color in each area, try a nice blend of a few colors, or a lighter/darker tone of the main color you want to use.
If you’ve already used one of these methods like I have, now is a great time to stretch your skills and try some of these other methods. You might surprise yourself with the results you can produce! I’d love to hear how you go in the comments section at the end of this post.
So let’s jump right in… take it away, Claire!
How to Blend Colored Pencils: A Beginner’s Guide
Guest Tutorial by Colour With Claire
You can blend wax-based pencils in a number of ways, four of which I’ll be showing you today. Each method has pros and cons which I’ll go into, but first of all it’s handy to point out the process that happens when you apply colored pencil to paper, and how things like pressure make all the difference.
When you are coloring, you can either use a light hand to build up color in layers, or go in with a medium-hard pressure which applies more pigment to the paper in one go.
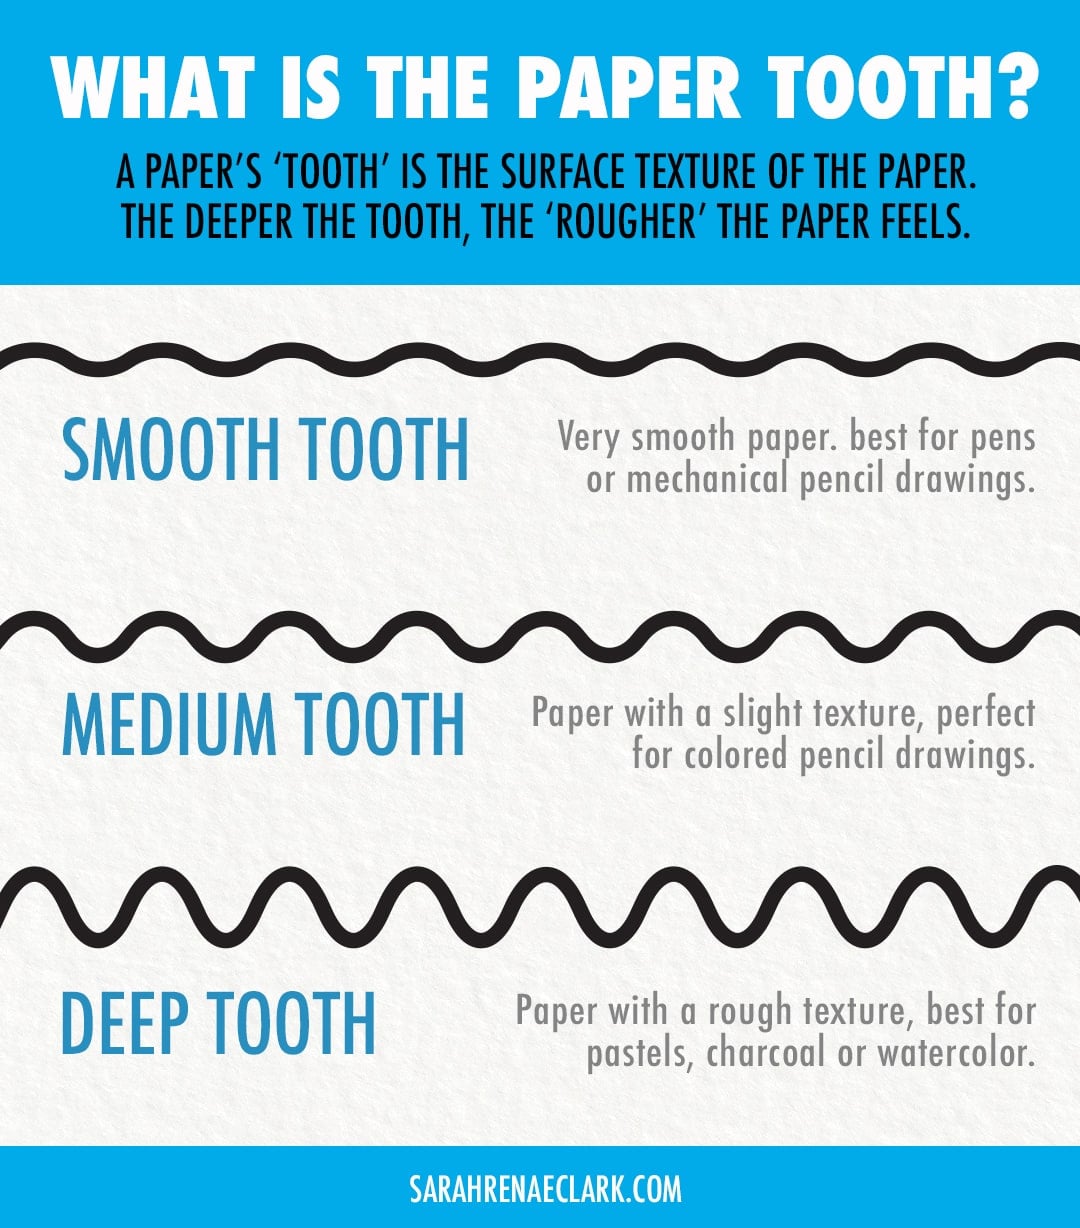
Paper surfaces are all different but none of them are completely flat (unless you’re using glossy, photo-type paper which is useless for coloring on anyway). If you look up close at paper, and feel the texture of it with your fingers, you’ll find some paper is rougher than others. This rough texture is called Tooth. If you looked at it under a microscope, you’d see that the paper surface is very jagged- like peaks and valleys. When you apply pencil with light pressure, you’re just laying the pigment on top of the peaks, which is why you’ll see lots of white speckles. The speckles are the valleys- the tooth you haven’t filled in. When you build up layers, you start to fill those valleys with pigment, like filling cracks in a wall. The speckles disappear the more you do this, and depending on the pencils and the paper it can take many, many layers to completely fill in the tooth.
When you use hard pressure, you’re essentially filling in and flattening all those peaks and valleys into one smooth surface without layering. When there are no speckles left and the tooth has all been filled in, you’re unable to add any more pigment to the paper. This is called Burnishing.
Colored Pencil Blending Method #1: Burnishing
My first and favourite method of blending is the burnish blend. This is where I use only the pencils and pressure to blend. As you can see in the picture below, I start off by using hard pressure at the edge of the oval to fill all the tooth, so I have a nice smooth Crimson Red to begin. As I move further into the oval, I ease up on the pressure gradually until I’m barely touching pencil to paper at all. The area that is still speckled is unfilled tooth, so we know that we have ‘room’ to add more pigment.

On the second picture above, I used Orange as my next color, but instead of applying it *after* the red, I begin just at the point speckles started to appear when I lessened pressure on the red. Essentially, you’re filling in the rest of the tooth that the red only skimmed the top of. Layering the orange over the light-pressure-crimson area is what blends the two colors together. I then do exactly the same as I did with the red: hard pressure at first to fill in the tooth completely, then gradually get lighter to set the foundation for the next color to blend in.
On the third picture you can see I’ve come in with Yellowed Orange, the same as I did before, and finally on the fourth picture I finished off with Canary Yellow.

Pros to this blending method: Quick, doesn’t require extra blending tools, retains vibrancy of color.
Cons to this blending method: Can be taxing on the hand as you’re using a lot of hard pressure, not much layering can be done as you’re filling all the tooth right off the bat, wax bloom can occur when you burnish (a milky film that appears over your work but can be wiped off).
Colored Pencil Blending Method #2: Blending Solution
The second blending method I use is applying odorless mineral spirits, otherwise known as blending solution or Gamsol. This can be applied with a tortillon (paper stump) or a paintbrush. You don’t need to use heavy pressure, just lightly apply the colors (overlapping each one slightly), then brush over with OMS (I have applied it on the top half of the oval only). The solution instantly breaks down the wax binder, leaving only the pigment, so the colors merge together easily. It does tend to dull the colors a bit, but it doesn’t matter because you can continue layering pencil between applying the solution. You may notice what looks like a grease mark on the underside of your paper but don’t worry, this disappears within minutes when the solution evaporates. This brand is my favourite.

Pros to this blending method: No hard pressure needed, easy to apply, instant results with little effort, leaves a good surface to keep coloring onto.
Cons to this blending method: Desaturates the vibrancy of color, can look streaky, isn’t very portable.
Colored Pencil Blending Method #3: White Pencil
The third blending method I use is the white pencil blend. As you can see on the picture I did exactly the same layering of color as with the Odourless Mineral Spirits (no pressure, overlap the colors) then applied a hard pressure layer of white to the top of the oval to burnish out the tooth and blend the color.

Pros to this blending method: Blends colors really well without streaking, leaves a soft, muted finish.
Cons to this blending method: Massively desaturates the color, looks very milky and light.
Colored Pencil Blending Method #4: Blender Pencil
My final method of wax pencil blending is using a colorless blender pencil. Prismacolor make one, as do Derwent and other brands. This pencil is totally devoid of pigment- it is filled only with colorless wax binder. Using medium pressure you can scumble (small circles) over the pencil layer you’ve put down, smushing the color together.

Pros to this blending method:Colorless so doesn’t affect the colors you’ve put down, quick, leaves a textured look.
Cons to this blending method: Doesn’t look smooth, is difficult to keep a consistent texture across larger areas, can sometimes look/feel scratchy.
Blending Oil-Based Colored Pencils
Oil-based pencils are less common and as you’ve probably guessed, contain oil as the binder rather than wax. (Actually, all colored pencils have some mixture of wax and oil in them, but if they have more of one type they’re put in that category.)
You can get colorless blender pencils with oil binders (Lyra Splender Blender being one) and odourless mineral spirits work with oil based pencils too, but my favourite method of blending oil based pencils is to LAYER, LAYER, LAYER.
Prismacolor users who find they ‘can’t get on’ with oil based pencils like Faber Castell Polychromos are likely using the wrong method of application. You cannot apply oil-based pencils in the same manner as you would wax-based. For a start, oil-based pencils have a much harder lead, so trying to burnish them with hard pressure straight away will leave you frustrated with their seemingly inability to blend. They require patient layering to get to the smooth, vibrant look that wax-based pencils can to achieve faster and easier. Many artists prefer oil-based pencils as they are known for being superior in their finish and blending capabilites. It just takes longer to get there!
In the series of pictures below you can see how I’ve built up the color by applying layers of pigment (this particular paper took 5 layers to burnish). You must keep your pencils sharp to better fill in the tooth, seeing as we can’t do it with heavy pressure. Light layers, one on top of the other, has the color slowly building into a bold, saturated, smooth finish. And you don’t get wax bloom!

Video Tutorial
Claire has recorded this helpful video to show you exactly how she uses these different methods of blending coloring pencils. Check it out below!
About the Author

Claire is a 35-year-old mum of two from the UK who has hosted her YouTube channel ‘Colour with Claire‘ since 2015. She is an enthusiastic colorist known for her vibrant coloring style and beginner-friendly tutorials. Her videos range from coloring techniques and reviews to art challenges and product comparisons, all with a focus on helping fellow colorists improve their skills and find inspiration.
![]()
![]()
![]()
![]()
![]()
@colourwithclaire
Sarah, this is so timely for me. Physically I am becoming less & less able to move around. So two days ago I dug up my collection of coloring pages & materials. As I assessed my stuff and started a page I got an idea. My daughter has been badgering me for lace, fabric from my huge quilting stash & other small objects in order to make these journals you can buy finished or in kits. I thought I might try my hand at them. Then I realized part of my journal pages could include pieces of my coloring pages. Collage style with ornate hankie parts, rice paper I’ve horded for years, little shadow boxes cut into the journal to hold handmade miniatures. I am bubbling with ideas. Blending my pencils is something I have worked at often so this tutorial is timed perfectly. Because of copywrite laws doubt I can use much of the actual pages I have now but they are great learning tools. Themes are next on my mind. You have been helpful since I “discovered” your blog years ago. I thank you very much for your inspiration.
Thank you! I got a totally different experience with color pencils and the types by watching you. I am a beginner …mostly.
THE DIFFERENT METHODS OF COLORING WITH OIL- BASED PENCILS WAS INTERESTING & KNOWLEDGEABLE INDEED.
I THANK YOU VERY MUCH FOR SHARING YOUR KNOWLEDGE & EXPERIENCE WITH OTHER PEOPLE. I ALSO DO WATER-
BASED COLOR PENCIL DRAWINGS. DO YOU HAVE ANY VIDEOS FOR WATER-BASED PENCILS ? IF SO, THEN LET ME
KNOW. THANKS AGAIN
Not yet, but I’d like to explore water-based pencils this year!
Thanks, very instructive!
Hi Sarah, just looking at your YouTube tutorials and just can’t take my eyes off from a few days. And finally found what I’ve been looking for. All your stuff is soooo….exquisite.
Thank you for all your hard work and I love all that you do. The colours and the whole concept is pure art.
Well done!
Thank you, Sarah, a very instructive video. You are a good teacher. I’ve been working with colored pencils for about 3 years, mainly creating mandalas rather than coloring in coloring books. I love color and appreciate learning more about working with the pencils. I haven’t tried oil-based pencils yet, but I plan to eventually.