Pinterest has been a game-changer for me when it comes to my online web traffic and sales.
Throughout this series of Pinterest marketing blog posts, I’ll show you all the strategies I’ve used to grow my website traffic exponentially using Pinterest (without paid ads).
In this post, I’m going to show you the key elements of getting Pinterest connected to your website to benefit from the increase in traffic. We’ll cover:
- How to verify your website on Pinterest
- How to activate “Rich Pins” on your website
- How to set up social share icons on your blog posts
- How to install and use the Pinterest widgets on your website
- How to create hidden Pinterest images in your blog posts
- How to add Pinterest descriptions to your website pictures
- Why you should set up an email newsletter to capture traffic
There’s a little bit of coding involved but I’ll try to keep this as simple as possible so that most people can do it!
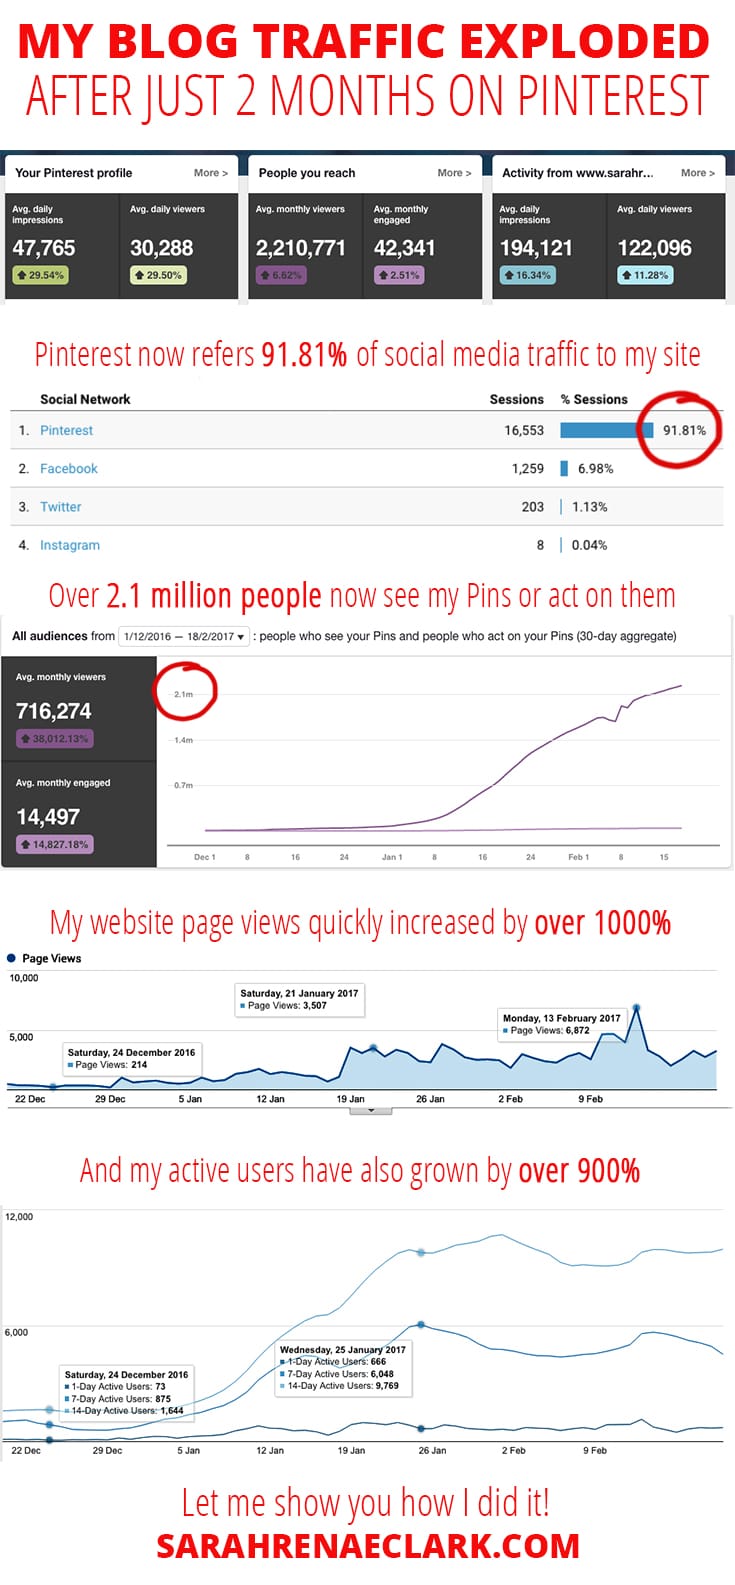
Here’s a look at my own website data from December 2016 (when I first started looking at Pinterest marketing) until February 2017:

In just two months, Pinterest has become my top source of organic traffic by far, has increased my sales and refers more than 90% of my social media traffic (compared to Facebook, Twitter, Instagram and Google+)
If you want to achieve the same results, make sure you check out my other posts on Pinterest and grab my free Ultimate Pinterest Marketing Checklist to get started.
Disclaimer: This post contains affiliate links and I may earn a commission if you click them and make a purchase. This is at no cost to you and I only recommend products that I love.
[thrive_2step id=’54582′]
 [/thrive_2step]

How to verify your website on Pinterest
The first step to seeing website traffic from Pinterest is to make sure Pinterest knows you exist! Verifying your website with Pinterest takes approximately five to ten minutes. Here’s how:
- Open your Pinterest Account settings.
- Scroll down to the Website field and click Confirm website.
- From here, there are two options: copy the meta tag or upload the HTML file. I’ve included instructions for both:
Using the meta tag:
- Copy the code provided and leave the window open.
- Add it to the section of the html file of your website just before the tag.
- Go back to Pinterest and click Finish.
Uploading the HTML file:
- Click download this file at the bottom of the window.
- Upload the HTML file to your web server at the root folder (common ones are called public_html, www, or wwwroot) – Do not rename the file or Pinterest won’t be able to find it.
- Go back to Pinterest and press Click here to complete the process.
From here, Pinterest will automatically check the meta tag and confirm your site. If you’ve installed it successfully, you’ll see this nice little tick box when you refresh your account settings page.
If you get stuck, check out Pinterest’s detailed instructions on their website.


How to activate Rich Pins on your website
Have you noticed that some Pins include a bit more information than others, such as prices, recipe ingredients, websites, and icons?
These are called Rich Pins… and they are essential to growing your website traffic! They also allow users to click back to you profile on any Pin from your website, even if you didn’t Pin it!

There are currently 6 different types of Rich Pins on Pinterest:
- App Pins
- Product Pins
- Recipe Pins
- Movie Pins
- Article Pins
- Place Pins
Here’s how to set up Rich Pins on your website:
- Make sure your website content includes meta tags. If you have Wordpress or Shopify, this is already set up for you.
- Choose any page that includes the data (for example, a blog post or product page) and copy the full URL of that page.
- Go to the Pinterest Rich Pin Validator and paste your URL, then click Validate.
- Fix any issues that show up, otherwise click Apply now.
- Your Rich Pins should start working in about an hour!
Note: You only need to validate one page for the Rich Pins to apply to your whole website.
If you’re stuck, check out Pinterest’s detailed instructions on their website.
![]()
How to set up social share icons on your blog posts
Social share buttons allow your audience to easily share your content on social media. They are an extremely valuable tool to encourage your audience to promote you to their friends.
You should add social share buttons to every page of your website, including product pages and blog posts.
Pinterest offers a save button on their website. It looks like this: (why not save this blog post to test it out!)
You can create a save button by going to the Pinterest Widget builder and following the instructions on the page.
If you get stuck, here are further instructions from Pinterest on getting your button installed.
If you’re using Wordpress and are already on multiple social media platforms, you may prefer to use a plugin that will add all of your social share buttons to your blog posts and pages automatically.
There are a number of free and premium Wordpress social share plugins available, depending on the style, location and options you prefer. Some plugins also offer a counter that shows the number of times your post has been shared.
After trying heaps of plugins, I now use Social Pug on my blog. There are other free social sharing plugins available if you do a search on Wordpress.

How to set up Pinterest widgets on your website
The Pinterest save button isn’t the only widget that Pinterest offers to businesses.
Head back to the Pinterest Widget builder and follow the instructions to create these other Pinterest widgets that you can include on your website or in specific blog posts:
- Pinterest follow button (like this – Sarah Renae Clark )
- A link to a specific Pin
- A link to your profile
- A link to a specific board (see below)
How to install a Pinterest widget on your website:
- Go to the Pinterest Widget Builder.
- Choose the widget you want to create.
- Complete the form with the details requested and check the preview is correct.
- Copy and paste the code onto your page where you want it to appear. On most website builders, there’s an option to switch to a text/HTML editor where you can paste the code.
- Make sure you also include the second code once per page.
And that’s it!

How to create hidden Pinterest images on your blog posts
You won’t always want all of your Pinterest images to be visible in your blog post, especially if you plan to create two or three for every post. So here’s a simple trick that I use to create hidden Pinterest images on my blog posts.
Let’s test this out… Try saving this page to Pinterest (click “Pinterest” on the social share buttons at the bottom) and you’ll see that Pinterest gives you two or three different tall images that you can Pin, and yet they’re actually hidden in this post. I’ve done this by adding a small bit of CSS code to my pages.
If you haven’t made any Pinterest images yet, check out my blog post on creating great Pins.
There are actually a few different way to hide Pinterest images, but here’s the most popular method.
To add the code, insert your image, then go to your HTML/text view and find the <img> tag for the image you just inserted.
Enter this before your image code: <div style=”display:none;>
And enter this after your image: </div>
Here’s an example:
<div style=”display: none;”><img src=”https://yourwebsite/ pinnable-image.jpg” alt=”your image description here” width=”736″ height=”1030″></div>
While this is a very popular method, it’s been known not to work for some websites. In some cases, your WordPress theme or plugins will have custom CSS code that overrides the ‘display:none;’ code.
If this is the case, I recommend using the Tasty Pins plugin, or trying one of these alternative methods instead.
[thrive_2step id=’54582′]
 [/thrive_2step]

How to add Pinterest descriptions to your website pictures
One of the most effective ways for your content to be discovered on Pinterest is to make sure all of your Pins have quality descriptions using relevant keywords.
But what if someone saves a Pin directly from your website instead of your Pinterest account?
Most casual pinners ignore the description box when they save Pins, meaning it’s highly likely that the original description will be attached to that Pin as it gets repinned by other people. So it’s important to make sure the original description on your website includes your keywords and the description that you want and isn’t left blank.
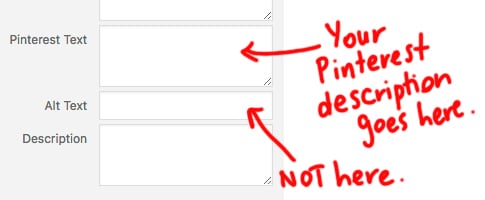
If you’re using Wordpress, this is super simple. Just add your description to the ‘alt text’ tag in your code. Or even better – you can use the Tasty Pins plugin to add a Pinterest-specific description to your images like this example below (this is much better than using the ‘alt text’ tag if you can).

In case you missed it, I’ve written more about how to create attractive Pins and write keyword-rich Pinterest descriptions in my previous blog post.

Why you should set up an email opt-in to capture traffic
This is a little bit off topic, but since we are optimizing our website to gain Pinterest traffic, I felt the need to include it.
The problem with any online platform is that you can’t control it. Your audience isn’t actually your audience. You are building a business on someone else’s system and are subject to their rules, fees and algorithms, which can change at any time. Even worse… your page could get shut down completely.
That’s why it’s important to use these networks to send traffic back to your own website and email list, where you can build relationships with your customers and grow your business.The best way to get your Pinterest traffic to sign up to your newsletter is to include an email sign up form on your blog post, your website header, your sidebar, and anywhere else. If you have something to offer your readers for free, even better!
The best way to get your Pinterest traffic to sign up to your newsletter is to include an email sign up form on your blog post, your website header, your sidebar, and anywhere else. If you have something to offer your readers for free, even better! That way you can capture the traffic that Pinterest sends to your website.
I currently use Mailchimp to send emails (Mailchimp is free for your first 2000 subscribers) and I use Optin Cat to create my sign up forms on my website.
In Summary
Getting your website set up correctly for Pinterest doesn’t need to take much of your time and can produce amazing results. You’ll see an increase in your traffic, your customers and your sales if you follow these steps and continue applying my Pinterest marketing tips from each of these blog posts.
In my next post, I’ll show you exactly how I grew my following from 200 to over 1200 in just two months. Check it out now.
Don’t forget to save this post for later and share it with your friends!
This article is an excerpt from my Pinterest marketing guide The Pinfluence Playbook.
In The Pinfluence Playbook, I’ll show you how I grew my website traffic from 16,000 to 57,000 monthly pageviews in just ONE month and what I do now to maintain a steady growth in about an hour per week.
“This guide has helped me to understand not only HOW to use Pinterest but WHY. I’ve read similar articles on this topic, but never so in-depth and never conveniently all in one place. Running my own business, I didn’t think I’d have the time to do all the of work involved for Pinterest, until now.
Just by following the first couple steps in this guide, the views on my business website have already increased by 92% in one week. I can’t wait to complete the rest of the steps and see how my business improves!” – Cristin April Frey, Cristin April’s Art
Click here to find out more and start growing your traffic!
[thrive_2step id=’54582′]
 [/thrive_2step]


Thank You for your information.
Why are you advising people to use inline CSS? The correct way would be to give image a CLASS and style it in external stylesheet.
html:
css:
.hidden {
display: none;
}
Wordpress users can add additional CSS code in theme customization panel.
Hi Milan,
A stylesheet is definitely the best option, however, most people don’t know how to do this or don’t have access to make these kinds of changes. I’ve provided the easiest option for people who don’t have a lot of experience with code. But your recommendation is a good one – I’ll mention it when I next update the article. Thank you!
I’ve been trying to find this Pinterest sharing plugin (social warfare) for so long! Thank you!