
If you’ve been using Pinterest to grow your website traffic, you’ve probably noticed that the best-performing Pins are images that are tall. Things like vertical title images, infographics or step-by-step photos get more repins on Pinterest than their horizontal equivalents. (if this is news to you, check out my other article on creating great Pins)
Unfortunately, these ‘pinnable’ images can also present a few problems; they slow down your website and they are annoying for your readers to scroll past – especially if you have more than one!
So how can you make the most of tall Pinterest images without including them in your blog posts? You could just upload the image straight to Pinterest with a link back to your blog, but anyone who visits your blog and tries to share it won’t be able to pin it, so they’ll end up pinning one of your other images instead – not what we want!
That’s why it’s better to host them on your website… and HIDE THEM!
A hidden Pinterest image means that your readers won’t see your tall ‘pinnable’ image until they press the Pinterest share button or the Pinterest browser button.
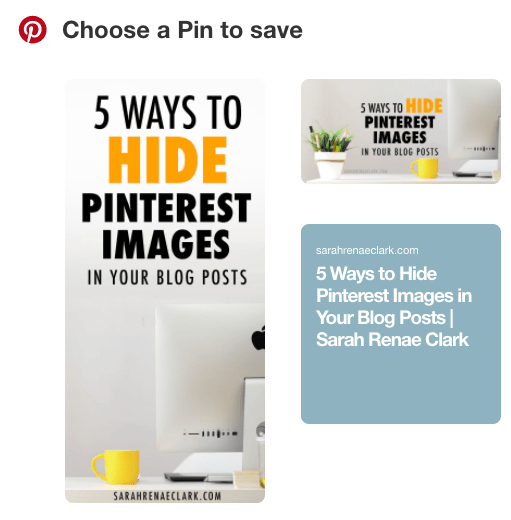
To see what I mean, try saving this post to Pinterest. You’ll see Pinterest gives you a tall image that isn’t visible in this post:
There are a few different ways to do this, so in this article, I’ll run you through each method so you can find an option that works for you. Some of these require a little CSS or HTML coding, but others are plugins that make the process easier for you.
This post contains affiliate links and I may earn a commission if you click them and make a purchase. This is at no cost to you and I only recommend products that I love.
[thrive_2step id=’54582′]
 [/thrive_2step]
5 Ways to Hide ‘Pinnable’ Images in Your Blog Posts:
- With the Tasty Pins Plugin
- With CSS code
- With custom CSS code
- Within another image using Pinterest’s HTML code
With the Social Warfare Plugin(NOTE: After glitches and issues with this plugin, I no longer recommend this option)
The first step in every method is to upload your pinnable image to your website. Make sure you use an appropriate file name, alt text and Pinterest description for your images.
1. Hide a Pinnable image with the Tasty Pins Plugin
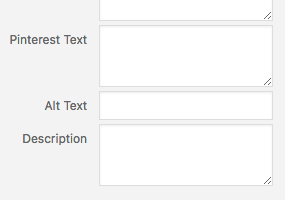
If you’re using Wordpress, this is is the easiest method to hide a pinnable image in your blog post. The Tasty Pins Plugin costs $29 and adds a box to the bottom of your blog posts where you simply upload your image.

WP Tasty then creates it’s own CSS code (it’s the same code we can create manually in the 2nd method in this article) at the top of your blog post – so it should be the first image Pinterest picks up.
At the time of writing this article, you can only hide one image using the plugin, so you’ll need to use a different method if you have a 2nd or 3rd image to hide. Update: You can now upload multiple hidden images with this plugin… yay!
This plugin also has some other Pinterest-friendly features, including the ability to tick a box on images you don’t want to be “pinnable” and an extra box to add your Pinterest description separately to your image’s alt description (using the Pinterest tags from our 3rd method below).
It doesn’t do anything you can’t do manually with HTML or CSS code, but it saves a lot of time (and confusion) for the small price tag.

2. Hide a Pinnable image with CSS code
This is the most well-known method to hide Pinterest images in your blog, and is the same code that the WP Tasty plugin uses. You don’t need Wordpress to use this code, as long as you have access to edit your HTML code. It’s the code I’ve been using on my own website.
The only downside to this method is that your website will still load the image, even if it isn’t visible. So if fast load times are a big priority, I recommend checking out the 3rd method in this article instead.
To add the code, insert your image, then go to your HTML/text view and find the tag for the image you just inserted.
Enter this before your image code: <div style=”display:none;>
And enter this after your image: </div>
Here’s an example:
<div style=”display: none;”><img src=”https://yourwebsite/ pinnable-image.jpg” alt=”your image description here” width=”736″ height=”1030″></div>
While this is a very popular method, it’s been known not to work for some websites. In some cases, your Wordpress theme or plugins will have custom CSS code that overrides the ‘display:none;’ code.
If this is the case, I recommend trying one of the alternative methods in this article instead.
3. Hide a pinnable image with custom CSS code
This method is a little more complicated – but once you’ve set it up once, it provides a quicker and cleaner way to hide your images with CSS.
This method has 2 steps. First, you need to create your custom CSS code within your website’s style sheet. If you’re using a Wordpress theme, it may include a ‘custom CSS’ section in the theme options where you can add this code.
If you can’t find anywhere to add custom CSS, you can edit your theme’s style.css file under Appearance > Editor > style.css
IMPORTANT NOTE: Always back up your website before making changes to your style.CSS file, and only do this if you’re already familiar with CSS to avoid breaking your website! It’s also important to note that changes to the style.css are sometimes overridden when you update your theme, so keep this in mind.
Add this code to the bottom of your style.css file or custom CSS panel:
.pinterest-hidden {
opacity: 0;
position: absolute;
top: 0;
left: 0;
height: 0px;
width: 0px;
}
Once you’ve done this step once, you shouldn’t need to do it again for future blog posts.
The next step is to upload your pinnable image and add it to your blog post as usual. Go to the code editor (“text”) in your post editor and add the CSS reference to your tag in the ‘class’ section.
Like this:
<img class=”pinterest-hidden aligncenter wp-image-403376 size-full” src=”https://yourwebsite/ pinnable-image.jpg ” alt=”your image description” width=”1000″ height=”1268″ />
This code tells the image to use the pinterest-hidden CSS style that we created in the first step.
[thrive_2step id=’54582′]
 [/thrive_2step]
4. Hide a pinnable image within another image using Pinterest’s HTML code
This is my favorite method, but I’m only just starting to use it.
Pinterest has it’s own data-pin HTML tags that you can add to your code to communicate with Pinterest. These work on any website – not just Wordpress, and not just blogs.
There are 3 different Pinterest codes you can use:
- Data-pin-url
- Data-pin-media
- Data-pin-description
You can use these codes to include a Pinterest-specific description for your images, to change the URL on the Pin that will be shared to Pinterest, or to change the image that will be shared.
In the context of hiding a Pinterest image, we can use the data-pin-media and attach our pinnable image to another image already on our website. It’s not ‘hidden’ as such, but it tells Pinterest that you’d rather use a different image when someone tries to share your post.
For example, I might want a horizontal title image on my blog post – which isn’t very ‘pinnable’. By adding this code to my horizontal image, I can point Pinterest to a pinnable vertical version of the image (hosted on my website) to share instead.
A big benefit of using this method is that because it’s not hiding anything in your website, it won’t slow down your website load time… and it will keep Google happy!
Compared to the other methods in this article, this method provides the most SEO and Pinterest friendly result, but it’s probably the most time-consuming.
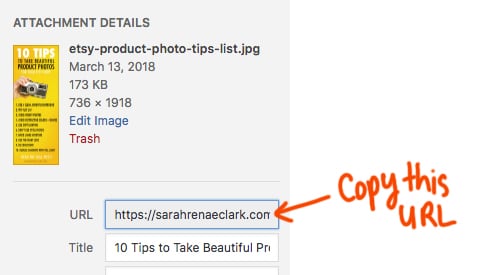
First, you need to upload your pinnable image to your website and identify it’s URL in the media viewer. Copy this URL and paste it somewhere that you can copy it back shortly.
Then, insert your normal image on your page (the one that will be visible in your post), then go to your HTML/text view and find the tag for the image you just inserted.
Add the following code within your new image tag, replacing the below URL with the URL that you copied from the pinnable image you want to hide:
Data-pin-media=”http://yourwebsite.com/your-hidden-image.jpg”
Your final code should look something like this:
<img src=”http://yourwebsite.com/visible-image.jpg” alt=”your description here” width=”217″ height=”267″ data-pin-media=”http://yourwebsite.com/hidden-image.jpg”>
The src code points to the visible image and the data-pin-media code points to the hidden image. Pinterest will use the ‘alt=’ description when people save your Pin unless you choose to include the data-pin-description code in your image as well.
If your website includes ‘Pin It’ buttons that hover over your images, this will use the hidden image instead of the visible image if someone tries to save it to Pinterest.
Extra note: I took this a step further and tried to create a tiny 100x200px white placeholder image to use in my post instead of a visible image, using the data-pin-media code to attach the hidden image. However, in my experiments, I found that the Tailwind browser button I use didn’t pick up the hidden image, and Pinterest could only identify the first instance of the placeholder – so my second or third hidden images (using the same placeholder image) weren’t found.
5. Hide a pinnable image with the Social Warfare Plugin
UPDATE: I no longer recommend using the Social Warfare plugin. However, this is up to you to use your discretion. You can read more information about the bugs and updates that occurred at the time I’ve removed my recommendation on their blog post here: https://warfareplugins.com/news/we-failed-hard/
I don’t personally use the Social Warfare plugin, so I can’t give you a full tutorial on this one. But this plugin is loved and used by many of my fellow bloggers and Pinterest marketers.
It includes a range of tools to hide images in your posts, add Pinterest descriptions, adding hovering “Pin it” buttons, and more.
This plugin is intended for social sharing beyond Pinterest. You can add sharing buttons to your blog posts for 15 different social platforms, show your social proof (number of shares), show off your most popular posts, add “Click to Tweet” buttons throughout your content, and provide pre-written custom descriptions for Pinterest and Twitter sharing.
It costs $29 per year, and is a great option if you don’t already have other plugins that do all of the above. Get it here.
Which hidden Pinterest image method is the best?
There is no right answer here. In fact, I often use a combination of the methods we covered in this article. But here are a few questions to ask yourself in making your choice:
Do you want to improve your website speed?
Any page that uses a ‘display:none;‘ code will still load the tall images, which are often huge files. If website speed is a priority, choose a method that uses the Pinterest tag instead.
Do you know how to edit CSS or HTML?
Messing with your CSS is a good way to break your website if you don’t know what you’re doing. If you’re not savvy with code, stick to using the Tasty Pins plugin.
Do you use Wordpress?
If you don’t use Wordpress, you might not be able to use the Tasty Pins plugin, so you’ll need to try the other methods instead.
Would you use the other features of the plugins?
I used to create my own code for hidden images, but now I use the Tasty Pins plugin (especially since you can now upload multiple images!) and to access the other features: such as the ability to quickly add a Pinterest description (better than using alt tags) and to turn off pinning on specific images.
You may also find that some of these methods work better than others on your particular website (depending on the CSS and plugins you’ve used) or when using scheduling tools like Tailwind, so it’s a good idea to test them out and find one that works for you.
Which method do you use? Please share in the comments below!
For more Pinterest tips, please check out my Pinterest blog series and my e-book, The Pinfluence Playbook.
[thrive_2step id=’54582′]
 [/thrive_2step]

Thank you so much for sharing this! I have been struggling with ways to hide Pinterest photos since I use Wordpress page Builder/Elementor. I’m def. going to try Tasty Pins. Thank you!
Hey Sarah,
#4 is my most favorite as well. It doesn’t have any load impact on my site speed.
Thanks for mentioning the Tasty Pins Plugin. I actually didn’t know about it before this post.
Enstine
How can you be sure the hidden posts are showing up on Pinterest? Because I have hidden posts but I feel like they’re not being seen or shared. For example, I have a post on ‘5 foolproof ways to silence negative self-talk for good,’ with one Pinterest image that shows and two that are hidden. Could I double-check that the hidden two can be seen/shared outside the blog? Maybe I’m just not understanding this concept 100% haha.
Hidden posts aren’t automatically available on Pinterest. They still require someone to come to your website and share you post. So the best way to start them circulating is to do this yourself! Pin your URL or download the Pinterest browser button, then share your own article to your boards. It will also give you the opportunity to check that your hidden image shows up as an option when you Pin the article. If it shows up for you, it will show up for others who do the same. I hope that helps clarify!
Can you attach multiple images with method for?
Hi Gretchen!
For method 4, you would need a different placeholder for each image. You can’t attach multiple hidden images to a single visible image.
I have a featured image on each of my wordpress blog posts. Since the image is added via the featured image tool, and not the actual blog post, there is no image tag in the body of the blog post that I can add to. I can’t change the URL attached to the featured image, either, so I’m not sure how to proceed.
Hi Erika!
Are you wanting to hide the featured image? Which code were you wanting to add?
If you’re wanting to change the Pinterest description or make the featured image not pinnable, the WP-Tasty plugin will do this.
However if you’re wanting to hide a second image within the featured image, I’d recommend just choosing a different method to hide your second image instead.
Hope that helps!
Thank you for this write up, Sarah! I use Social Warfare plug in on my website, and I love it (love the plugin, not its name, haha). But I will give the other methods a try too. Your blog is really helpful, thank you!!
You’re welcome! I haven’t personally used Social Warfare, but it’s been recommended by many of my friends!