Now that you’ve optimized your Pinterest profile and set up your boards, it’s time to start filling them with great content!
When I first started saving Pins, I thought that quantity was more important than quality. I assumed that more content would result in more exposure. But things like broken links or spammy content can have a negative impact on your account in the long run and can frustrate your followers.
Pinterest looks at the quality of your Pins and will rank your profile accordingly. Pinners who regularly pin quality content will find that Pinterest shows their content to more people, which overall results in more repins and greater exposure.
Here’s what we’ll cover. Click a section to skip ahead:
- What Pins are the most popular on Pinterest?
- Why your descriptions matter on Pinterest
- Where to find quality content to share on Pinterest
- How to create Pins from your own content
- How to hide Pinterest images in your blog posts
- How to schedule your Pins with Tailwind
Most marketing professionals recommend the 80/20 rule: Share 80% of other people’s content and 20% of your own for the optimal engagement.
Saving Pins from other people can help you to fill your boards much quicker, provide more value to your audience and show up more often in Pinterest related searches and recommended results.

Before we start, it’s important to know what a quality Pin looks like. You don’t just want pretty Pins, you want Pins that will be repinned thousands of times and attract new followers to your profile and website.
Disclaimer: This post contains affiliate links and I may earn a commission if you click them and make a purchase. This is at no cost to you and I only recommend products that I love.

What Pins are the most popular on Pinterest?
Companies like Buffer, Curalate and Hubspot have done extensive studies on what makes a Pin popular. I’ve collected some of their tips in this list below:
The common features of highly successful Pins:
- Images are always high quality, not pixelated.
- Images are vertical with an aspect ratio of 2:3 or 4:5.
- Pin descriptions between 100 and 200 characters get repinned the most.
- Pins with prices get more likes. The best way to do this is to activate Rich Pins on your website.
- Pins without faces are repinned 23% more often.
- Images with multiple dominant colors are repinned more than images with a single dominant color.
- Red, orange and brown images get roughly twice the repins of blue images.
- Tutorials, guides and DIY Pins have higher click through rates than other Pins.
- Infographics are liked and shared on social media 3x more than other content.
- The most common words on popular Pins (in order) are: make, one, easy, recipe, free, chicken, paleo, love and great.

Why your descriptions matter on Pinterest
Pin descriptions are an important consideration for those seeking to be found on Pinterest. The keywords you use will determine how often you show up in Pinterest search results, and even Google search results.
Pin descriptions have a 500-character limit, but the best performing Pins use only 100-200 characters.
A good Pin description will:
- Provide context for the image
- Provide tips, opinions, ideas or additional information about the image
- Use descriptive keywords
- Include a call to action
- Include a link to your website (Use a direct link, NOT through a URL shortener like bit.ly because Pinterest doesn’t allow redirects and will block these links)

Where to find quality content to share on Pinterest
The easiest way to find good Pins is to search for your topic or niche within Pinterest. You can see how popular Pins are by checking their repin count at the bottom. Pinning more popular Pins will help to increase your repin count and will tell Pinterest that you are popular too!

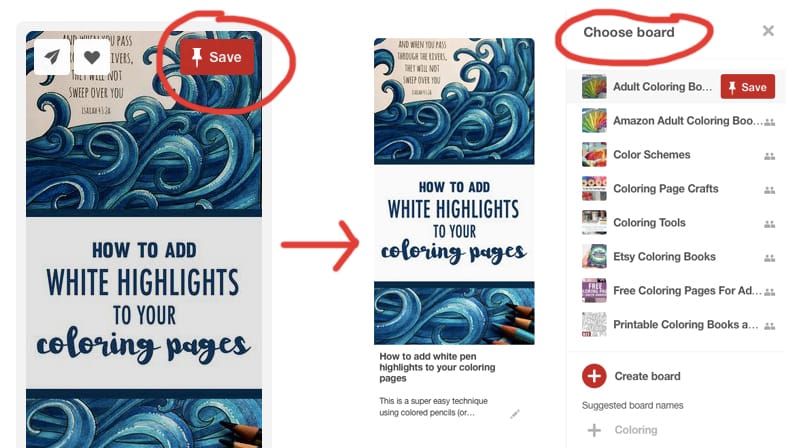
You can repin content from Pinterest by clicking “Save” and selecting one of your boards.
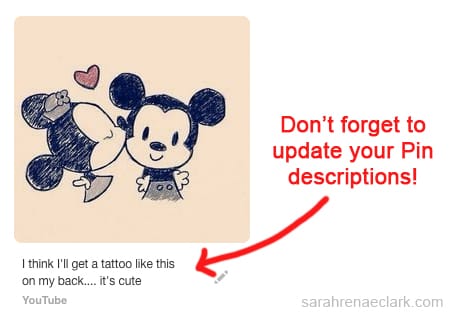
TIP: Make sure you check the Pin description before you save someone else’s Pin. It’s awkward when you accidentally repin something with a description like this:
It’s also important to click through on other people’s Pins to check the quality of the source and make sure it’s relevant for your audience. Sharing quality resources will build trust with your followers and increase the likelihood of your content being repinned by them. It will also help you to identify if any of them lead to broken links or spam websites.
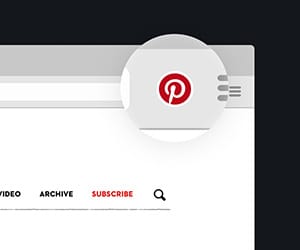
You can also save content you find anywhere on the internet. The best way to do this is to install the Pinterest browser button. Once installed, you can press the button whenever you find something on a website that you want to save to your Pinterest boards. Tailwind also offers a free browser button so you can add content from the web or directly from Pinterest to your automated schedule.

How to create Pins from your own content
Now that you know what kind of Pins do well on Pinterest, you’ll be able to create your own attractive Pins that will get lots of repins, increase your website traffic and increase your sales.
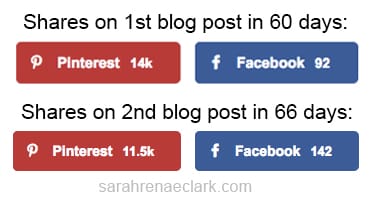
Two of my Pins received over 10,000 shares in the first two months, resulting in double the sales for the product that was mentioned in one of the Pin and a huge increase in website traffic.
Before you start creating Pins, you’ll want to make sure your website is set up for Pinterest. (I’ll teach you how here)
I usually create two to three Pins that describe my blog post or product using Adobe Photoshop. If you don’t have Photoshop, you can also use free software such as Picmonkey or Canva to produce high quality images for Pinterest. Creating multiple images gives you the chance to compare which style has the biggest reach on Pinterest and increase your exposure.
Here’s an example of some of the best performing Pins I’ve created:
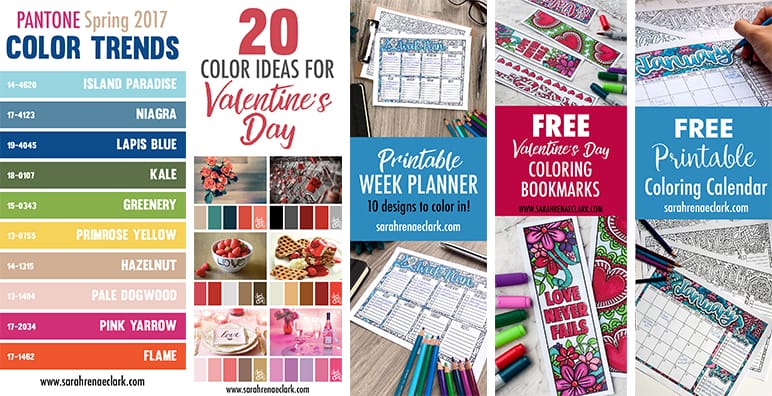
I try to follow a consistent format on all my Pins, using similar fonts and layouts so that my brand becomes recognisable as more posts show up in Pinterest. (I’m still working on this!)
Here are a few tips for creating your own Pins:
- Design your images 735px wide. The height doesn’t matter, however a ratio of 2:3 is best.
- Include your URL at the bottom of your Pin to assist in direct people to your website and to avoid your images being stolen.
- Consider colors, pictures, layout and words based on what is popular on Pinterest (you can refer back to my list above).
- Increase your searchability by including keywords in your image filename (i.e. “free-butterfly-coloring-page.jpg” instead of “DSC0535.jpg”).
- Add some text on the image so it’s clear what your Pin is about, even without the description (Some descriptions are hidden on mobile devices, so this is worth keeping in mind).
[thrive_2step id=’54582′]
 [/thrive_2step]

How to hide Pinterest images in your blog posts
Instead of uploading your pictures directly to Pinterest, it’s better to host them on your website so your visitors can also save them directly from your website.
If you’ve got a blog, you should incorporate pinnable images on every blog post. You can do this by adding them to the bottom of your posts or pages in the same way that you upload other pictures.
Instead of entering your 100-200 character description into Pinterest, it’s better to add your description to the meta data of your image on your website so that it will show up if your visitors save it too. To do this, you can add your description to the ‘alt text’ tag in your code. Or even better – you can use the Tasty Pins plugin to add a Pinterest-specific description to your images like this example below (this is much better than using the ‘alt text’ tag if you can).
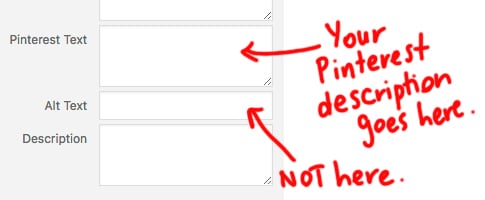
Obviously you won’t always want all of your Pinterest images to be visible in your blog post, especially if you plan to create two or three for every post. Instead, you can create hidden Pinterest images on your blog posts with a little CSS code.
Let’s test this out… scroll to the bottom of this page and use the social share icons to save this post to Pinterest. You’ll see that Pinterest gives you 2-3 different tall images that you can Pin, and yet they’re actually hidden in this post. I’ve done this by adding a small bit of CSS code to my pages.
To add the code, insert your image, then go to your HTML/text view and find the <img> tag for the image you just inserted.
Enter this before your image code: <div style=”display:none;>
And enter this after your image: </div>
Here’s an example:
<div style=”display: none;”><img src=”https://yourwebsite/ pinnable-image.jpg” alt=”your image description here” width=”736″ height=”1030″></div>
While this is a very popular method, it’s been known not to work for some websites. In some cases, your WordPress theme or plugins will have custom CSS code that overrides the ‘display:none;’ code.
If this is the case, I recommend using the Tasty Pins plugin, or trying one of these alternative methods instead.

How to schedule your Pins with Tailwind
After all the effort of creating your own Pins or finding quality content, you’ll want to get the maximum exposure for your Pins.
I do this by saving my content to multiple relevant boards on my account, including several group boards (which I’ll cover in more detail in my post about how to get your first 1000 followers on Pinterest) using Tailwind, which is a Pin scheduling tool. The benefit of a scheduling tool is that you can spread out your Pins over an interval, so you’re not saving them to every board at once.
Here’s an example of the schedule for one of my Pins:
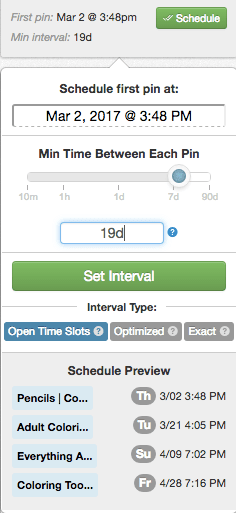
You can schedule your Pins with a free trial of Tailwind. Scheduling your Pins with Tailwind will save you hours and automate your Pinterest strategy so you don’t have to sit on Pinterest all day.
The great part about scheduling a Pin to multiple boards is that one piece of content will get far greater exposure. I use Tailwind because I love the ability to set an interval of any length (see above) so that my same Pin gets exposure over time instead of annoying my followers by posting it on 10 boards at once.
In Summary
The quality of your Pins will make a huge impact on how many people see your content. Instead of “hoping” for exposure, you can show Pinterest that you are popular and become an incredibly valuable resource to your followers.
Remember to share approximately 80% of content from other people, but make sure you check the Pin description and the link so you know what you’re sharing. If you’re ready to start creating your own Pins, think about the overall look you want to represent your brand so that your Pins can be consistent and attract the right audience.
In my next post, I’ll be going into more detail on how to optimize your website for Pinterest to encourage people to click through and continue sharing the beautiful Pins you’ll be making.
If you don’t have a website yet, not to worry! You can jump ahead to my post on how to get your first 1000 followers.
Don’t forget to Save this post for later and share it with your friends!
This article is an excerpt from my Pinterest marketing guide The Pinfluence Playbook.
In The Pinfluence Playbook, I’ll show you how I grew my website traffic from 16,000 to 57,000 monthly pageviews in just ONE month and what I do now to maintain a steady growth in about an hour per week.
“Sarah’s Pinfluence Playbook is totally value for money. I have taken other Pinterest courses and know a lot about Pinterest, but being able to see how Sarah has used the platform to exponentially grow her traffic and audience was incredible. She has a fresh and approachable take, with actionable advice. I felt super inspired to revisit my Pinterest strategy with her guided advice.” – Rachel Korinek, Two Loves Studio
Click here to find out more and start growing your traffic!
[thrive_2step id=’54582′]
 [/thrive_2step]



Hey Sarah,
Does the pin count still show up. I can’t seem to find it. I also am having trouble renaming my saved pin (have they removed this feature?)